
All Standing – a quick look at standing rigging
I reckon that you have by now had your fair share of esoterica, so let us start getting down to the practical aspects of standing rigging. What I am going to do over the next two or three articles is to develop consistent sets of equipment based on the strength of the wire being used to keep the spars in place. There are two main objectives for doing this. Firstly, the standing rigging is not an area of the boat where guess-work or aesthetics pay dividends; we need to be talking engineering here. Secondly, there is no point in re-rigging using stronger wire “just for good measure” if the attachment points on your spars and hull are not similarly upgraded. Doing so adds weight, windage and cost for no benefit. The guide-line I’ll be using here to develop these consistent sets is that the attachment points and tensioners for the wire should be 1.5 times the strength of the wire. This means that the first thing to break is the wire itself, which is sensible because it is one of the more easily inspectable and replaceable items in the system. As we saw in the last article, sizing the wire includes factors of safety anyway, typically about 2 to 4 times the design load, so I’m not looking to shave things too fine here. But I am going to have to assume that by some means you know the size of wire that you actually need.
Strands of Thought
So what sort of wire is available? The variations of wire rope which exist are many, but the types used on the kind of boats which we are considering are relatively few, so I’ll just deal with the ones you might come across.
Stainless steel wire rope is virtually maintenance free, but is fairly expensive and does have limitations. Chief amongst these is that it often gives little or no warning of failure, principally because stainless tends to corrode out of sight or, more correctly, out of oxygen. This means that visual inspection cannot give a complete assessment of the state of the wire, though if splinters or other surface defects are visible the wire should be replaced.
The construction of wire rope is described as X x Y, where X is the number of wires in each strand, and Y is the number of strands in the rope. Three are commonly used in stainless:
1 x 19 – size for size the strongest simple wire you can get, and by far the most common for standing rigging. It does not like being bent, so is not suitable for running rigging.
7 x 19 – less strong than 1 x 19, but much more flexible, and thus used for halyards, running backstays, gaff spans etc. It should run over sheaves at least eight times the diameter of the wire – not usually a problem except for centreplate winches where space is always tight.
7 x 7 – middling in terms of strength and flexibility, so used where the rigging is looped over spars. Also because of its construction, you can make wire splices in this rope.
Galvanised wire seems to be regarded, unfairly in my view, as a poor relation to stainless. Certainly it is cheaper, some 50-60% of the cost and it does require some maintenance. Every six months or so a “gloop” of boiled linseed oil (not raw – it will stain your sails, hands and anything else) and paraffin wiped on with a rag will be needed to keep rust at bay. Varnish and/or tar are sometimes suggested for protecting galv. wire, but these can crack and let in water. If you prefer a modern concoction, “Waxoyl” is reputedly very good. Whichever you choose, the maintenance load is hardly onerous by comparison with rest of the things you need to do.
Besides cost, galvanised wire has one great advantage over stainless. Since steel requires oxygen to corrode, it will do so more overtly than stainless and will almost always give warning of failure by dribbling rust streaks or splintering. Thus a visual examination combined with bending or twisting the wire to see the core will give a good idea of its condition. You may have to remove some serving to get a complete check. Unless you do wire splices – brave soul! – fibre core galv. wire (ie 6 x 7 or 6 x 19) has few advantages for small craft use, so the most common types are 7 x 7 for standing rigging and 7 x 19 for running rigging.
One area where stainless wins over galvanised, however, is as forestays. Jib hanks sliding up and down can quickly remove the protective zinc on galvanised wire, so exposing the bare steel.
The strengths of these wires is listed at Table 1. I’ve included 2.5mm wire since it is used on some small boats, particularly for halyards, but I would not recommend fitting it to a non-racing boat. Thin wire can act like a cheese-cutter on cold wet hands, so 3mm is probably a sensible lower limit, even though it may be too strong for your needs on a small boat.
Breaking Loads (kg) for Wire Rope
| Stainless | Galvanised | |||||
|---|---|---|---|---|---|---|
| Diameter (mm) | 1 x 19 | 7 x 19 | 7 x 7 | 7 x 7 | 7 x 19 | 6 x 19 |
| 2.5 | 500 | 450 | ||||
| 3 | 720 | 510 | 550 | 580 | 580 | 500 |
| 4 | 1290 | 910 | 970 | 1040 | 1040 | 890 |
| 5 | 2000 | 1420 | 1510 | 1620 | 1630 | 1390 |
| 6 | 2900 | 2040 | 2200 | 2330 | 2350 | 2000 |
| 7 | 3550 | 2835 | ||||
| 8 | 4650 | 3630 | 3900 | 4150 | 3820 | 3550 |
| 10 | 7250 | 5700 | 6310 | 5910 | 5750 | |
Terminal Problems
You can’t tie knots in wire, so various methods of termination have evolved to enable it to be used. These can be grouped into “made-up” and “add-on” terminals. The “made-up” ones involve forming an eye in the wire, and comprise hand splices, “Bull Dog grip” splices, and “Talurit” splices. It is outside the scope of this series of articles to give a full description of hand splicing wire and anyway, Brian Toss has described it much better than I ever could, so I’ll move straight to the Bull Dog grip approach. This may not give the tidiest splice, but it is quite satisfactory so long as you put three grips on the right way round. The figure below shows the right and wrong way to do it. This method has the advantage that you can make up a splice in situ with simple tools, and if you don’t have grips it is also possible to use wire seizings to the same effect.
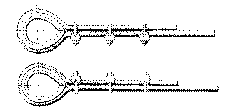 |
Correct |
Wrong and unsafe |
“Talurit” or “Nicopress” splices are formed by compressing tubes – called ferrules – on to the wire. This is a very effective way of terminating wire, so long as the splice is correctly made. Points to watch for include:
Choice of materials – for stainless wire, use copper ferrules and stainless thimbles; for galvanised, aluminium ferrules and galvanised thimbles. If a stainless thimble is used on galv. wire, the strands closest to the thimble will rot away within a season or two. I had the embarrassing task of returning a borrowed Wayfarer with a very bent mast due to a mistake here.
Beside that, the ferrule should not be jammed up against the thimble; about a wire diameter clearance is needed. Also, the free end of the wire should be just visible in the ferrule once the splice is made up – any longer and the press can’t close fully, any shorter and the splice is not as strong as it could be.
Finally, don’t attempt to use this system on old or dirty wire, because the strength of the splice depends on the material of the ferrule being squeezed into the gaps between the strands of the wire.
Moving on to the “add-on” type of termination, these avoid the need to bend the wire. The options include poured sockets, swaged or swageless terminals. I have to confess that I have not seen a poured socket used on a boats rigging for at least 10 years, though they are still used industrially. They consist of a fork or eye end attached to a hollow conical tube. The wire is inserted into the tube, which is then filled with molten zinc and allowed to cool. The snag with these are that it is not terribly easy to keep the kit needed to do these ends on site; the good bit is that they can be used with galvanised wire, which swaged and swageless cannot.
Swaged terminals – with fork, eye or stud endings – are like a tube which fits over the wire and is then squeezed on by a rolling press. This is probably the most widely used method on modern boats. It has two main drawbacks. Firstly, and unusually, an inexperienced operator can over-compress the terminal which will lead to cracking. Secondly, an unprotected terminal of this type at the lower end of a stay can create a perfect starting point for corrosion once sea-water enters and stagnates. At the upper end of the stay where the environment is less hostile such endings are fine. I know that there must be a great many swaged terminals sailing around at the lower end of stays, but they have the potential to be unreliable. If you don’t want, or can’t have, a splice, then swageless terminals provide the solution.
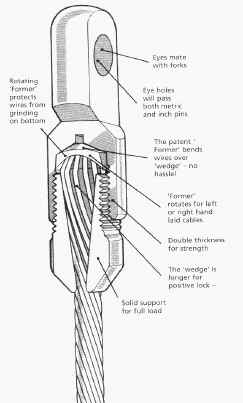
These are the cone type fittings – “Sta-lok” and “Norseman” are two trade names – and they have the advantage that, though expensive, they do not require special tools for fitting. A couple of spanners, sealant and thread locking fluid will suffice. You can also re-use them on new wires and because the terminals are filled with insulating sealant, rather than electrolytic sea-water, corrosion problems are minimised. Figure 2 – reproduced by kind permission of Sta-Lok Ltd – shows the components of the system. You need to use the correct cone for the construction of the wire, but apart from that these terminals are straightforward to use. Unfortunately, neither swaged nor swageless terminals are available for galvanised wire.
The various methods and their applications are summarised in Table 2.
Table 2: Application of various Methods of Termination
| Type of end | Stainless 1 x 19 | Stainless 7 x 7 or 7 x 19 | Galvanised | |
|---|---|---|---|---|
| Hand splice | eye | no | yes | yes |
| Bull-Dog Grip | eye | yes up to 6mm | yes | yes |
| Talurit Splice | eye | yes up to 6mm | yes | yes |
| Poured Socket | Fork or eye | no | no | yes |
| Swageless | Fork, eye or stud | yes | yes | no |
| Swaged | Fork, eye or stud | yes | yes | no |
So far, so good. Now we have to connect the wire to the hull or spars. I’ll come on to mastbands in the next article, but just to give you something to mull over in the meantime, I thought a comparison of shackle strength to wire strength might be of use. As you can see from Table 3, for a shackle of the same strength as the wire, you need to multiply the wire size by about 1.5 for stainless wire and shackle, and double it for galvanised wire and shackle. In practice, this is often quite difficult to achieve because the eyes or other attachments are not big enough to accept the shackle, and this is where potential weakness can be incorporated. It is likely that a quick inspection of your nearest boatyard or marina will provide a number of examples of undersized shackles connecting stays to hull or spars. While it may have the advantage that you know where a failure is going to occur, such an arrangement is dodgy to say the least. Have a quick look at your own boat to see if you are suffering similarly!
Table 3:Shackle Strengths compared with Wire Strengths
| Stainless Shackles | Galvanised Shackles | ||||
|---|---|---|---|---|---|
| Size(mm) | B.L.(kg) | For wire dia(mm) | Size(mm) | B.L.(kg) | For wire dia(mm) |
| 4 | 750 | 3 | |||
| 5 | 1200 | 4 | 5 | 320 | |
| 6 | 1750 | 5 | 6 | 600 | 3 |
| 8 | 3000 | 6 | 8 | 1000 | 4 |
| 10 | 5800 | 7 or 8 | 10 | 1600 | 5 |
| 12 | 7000 | 10 | 12 | 2500 | 6 |
| 16 | 13250 | 16 | 4000 | 8 | |