
In the last article we covered stays and mastbands. To complete the picture for staying the mast, I’ll now look at chainplates, shroud tensioners and backstays.
Shrouded in mystery
As far as the connecting lugs on chainplates go, they should be at least of the same dimensions as those on the mastbands – see previous articles. It is also helpful if you reduce the work that a toggle has to do by bending the lug to align with the stay if the lug lies fore-and-aft.
But how big should the chainplates be? Well, in the words of a famous London actor, not many people know this, but chainplates are held onto the hull not just by their fasteners, but also by the friction between plate and hull which is generated by the fasteners. As in the case of the spars, the amount of friction you can generate is limited by the crushing strength of the wood. Plug in a few numbers and for each tonne of shroud load, you need 60mm2 total bolt area acting on 4500mm2 of plate area against the hull, and a plate cross section area of 120mm2. As an example, 4mm galvanised wire would therefore need a chainplate about 25mm wide x 200mm long x 5mm thick, held on with at least 2 6mm bolts. In an ideal world, one would fasten chainplates with bolts because they can be tightened up positively. In practice, it is often the case that the uppermost fastening hole has to be fastened by a screw because of the beam shelf or rubbing strake in that area. It is probably safest to discount the effect of this screw when totting up the fasteners required.
Sometimes the stays need to clear the bulwarks. The options here are to fit channels, or extend the chainplates themselves up through the bulwarks. Channels have the significant advantage of widening the shroud base, so reducing the shroud loads. They also provide an excellent place to anchor legs, if that is the kind of thing you are into. The snag with channels is that they may be vulnerable, for example when coming alongside. Running the chainplates up through the bulwarks, on the other hand, keeps all inboard, and means that the rigging screws or whatever start above bulwark level. In technical terms, I can’t find any objection to this arrangement, the logical extension of which is rod rigging, but intuitively I don’t like the idea of chainplates extending above the deck line.
What length should chainplates be? On carvel/strip construction, length is a function of the required area and bolt size, constrained by an aesthetically acceptable outcome. Something like 8 to 12 to 1 seems about right, but this is not prescriptive by any means. On clinker construction, you will almost certainly need to extend the length required, partly to compensate for the lower contact area, and also to align the chainplate ends with the edge of one of the strakes. On steel or GRP, where you can weld or bond, you can have pretty much any shape you like so long as there is enough weld metal or resin.
Cranking it up
Right so now we have stays, and connectors on the mast and hull. All that is left is to tension them.
The most common solution these days is to use rigging screws. These are very effective and come in a range of styles. Galvanised ones are cheap, usually closed body, need greasing for protection, and will rust horribly before actually breaking under normal service loads. Stainless steel ones are less cheap, usually closed body, can spall – where the threads seize together – if not greased, and can corrode if greased. Bronze ones are even less cheap, but are a fit & forget item. Unless broken by an abnormal load – often during mast stepping – they last more or less indefinitely. You can also get rigging screws which use a chromed bronze body with stainless terminals. This overcomes the spalling problem, but you are stuck with a silver colour. Finally, while we are discussing bronze rigging screws, there is a range made for smaller boats which are shaped to allow hand tightening. This comes into its own for trailer sailers, especially those who leave their tools at home. Whichever type of rigging screw used, please put locking wire on.
Other options? Well why not set up your stays using lanyards or lashings? They are very light, very cheap, don’t corrode, but can chafe. The table shows how many turns you need of a particular rope size to match the strength of a wire, and it is surprisingly few. Now I know that such an arrangement is not as stiff as a rigging screw, but for most rigs and uses, that simply does not matter. Rather like looping the stays over a mast, it is an option often neglected in the name of modernity.
| Rope Lashings | ||||
|---|---|---|---|---|
| Turns needed to match strength of wire of this dia | ||||
| Rope Dia (mm) | 2.5mm | 3mm | 4mm | 5mm |
| 2 | 6 | 8 | – | – |
| 2.5 | 5 | 7 | 12 | – |
| 3 | 3 | 3 | 6 | 9 |
| 4 | 2 | 2 | 3 | 5 |
| 5 | – | – | 3 | 4 |
For the real traditionalists, of course, deadeyes are the thing. This is where I part company with the traditionalist. Deadeyes are no more effective than lashings – apart from reduced chafe – and these days more expensive than rigging screws. Rather like wire wheels on cars, there is really no technical justification for their use, though some boats demand deadeyes on aesthetic or historical grounds. I’m sure the owners of such boats know perfectly well how to set them up.
Runners – and riders
That is about it for shrouds, but before getting to the practical aspects of mast furniture, I’d like to deal with the rigging aspects of running backstays. These are fitted to increase the support aft to the mast, and so to increase forestay tensions. Reduced foresail sag will in turn improve performance to windward. So if you want to jack up the performance of your rig, just add running backstays. Er… no.
Runners are not a bolt-on goody. Adding them will increase the rigging loads on the chainplates, forestays and mast (will it still be strong enough?) not to mention the hull in way of the mast step. Unless you are prepared to go the whole hog, runners will cause at least as many problems as they solve. Anyway, even on a good day they can be a pain which is why so many working boats did not fit them, compensating instead with heavily raked masts (Chesapeake Bay boats), “swifter” shrouds swept aft (Bristol Channel Pilot cutters) or nothing at all (Essex Smacks).
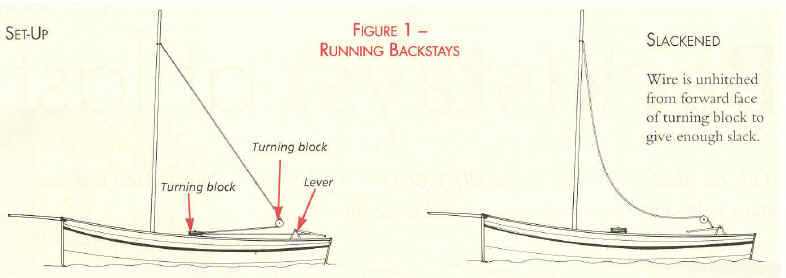
However, let us assume that you have runners fitted, and that they are meant to be there. What is the best way to tension them? For larger boats, runner levers – essentially glorified over-centre catches – are very effective. Their major drawbacks are twofold. Firstly they occupy deck space, usually beside the cockpit, and on smaller craft this can be obtrusive. Secondly, because of the short travel of the levers themselves, you need to have a scheme to create enough slack in the runner so that the boom can be squared off. Some runner levers incorporate a hook so that the runner can be detached, but the rules of normal life may mean that you can’t get hold of the errant hook at critical moments. Other systems use an open ended turning block mounted on the deck – see figure 1 – to generate enough slack.
Instead of levers, you could use tackles, typically four to one. Now you can use a spare windward winch to tension these, until you want to set up both runners during a bout of close tacking. For that reason it is usually better to organise a separate system of cleats or stoppers. On smaller craft, blocks with integral jam or cam cleats can be used to good effect.
There is, however, a neater system still, though I’ve only seen it on small craft. That is to have the runner made up to a fixed length, ending in a slide. This slide engages in a track running fore and aft. To tension the runner, you pull the slide aft, where because of the geometry of the thing you get plenty of mechanical advantage. To release the runner, you slack off the tensioning line, and let the slide run forward. Clever or what?
All this leads me fairly seamlessly onto what effect tensioning the backstay has. If you have a backstay which leads to a single point on the mast, the answer is obvious. If on the other hand, the stay is split to support both the hounds and the masthead, it is less clear what is happening. Often you will see that this arrangement is achieved by means of a strop which goes from masthead to hounds via a block mounted on the end of the runner – see figure 2.

This is not a good idea. Why not? Because the upper span slides around the sheave of the block until forces are equalised. This is fine, but it does not control the displacements of the various points of the mast which is usually the whole point of fitting rigging. Aside from the nervousness created when you see the stick bending like fun, the relatively unsupported masthead means either that your reefing/ furling gear won’t work properly, or that your windward performance is reduced. Which was why runners were fitted in the first place.
Is there a way out of this? Apart from fitting two pairs of runners, the trick is to remove the block from the span and fit a rigid link of some sort – often a triangle plate or shackle. I know that this is fiddly to set up to the right lengths, but such a scheme means that the masthead and hounds are restrained in approximately the right position irrespective of the loads acting at any particular time.
I think we have finally covered the sometimes slightly abstract “engineering” aspects of mast stays. What I haven’t yet addressed are the practical details of the various fittings, so we’ll have a look at those next time.