
The subject of this article is mainsail reefing. I’m just dealing with mainsails because I am still on the subject of booms, in case you were beginning to lose the plot of this series!
Reefing is rather like waking up in the middle of the night wanting to go to the toilet. However much you might wish it, you can’t go back to sleep, but instead spend precious minutes in a sort of “shall I, shan’t I?” routine. By the time you finally get up, you are thoroughly awake and wish you’d just got up in the first place. So it is with reefing; if you find yourself wondering if it is a good idea to reef, you are usually better off to do so. The temptation to press on has cost me at least one No. 1 Genoa, and two memorable entrances into harbours whose successful outcome was a lot more to do with luck than judgement. A key factor in the decision – of going to the toilet or reefing – is how easy it is to do. Hence the popularity of en-suite bathrooms and the purpose of this article.
I’m going to skip lightly over roller reefing gears, since the fittings and layout are a foregone conclusion if that is the way you want to go, and the relative merits of such gears is well documented in books which deal with seamanship and similar matters. The rest of this article addresses the various forms of slab or points reefing.
What do we want?
I think it worth setting out a number of criteria for success, since there is an unfortunate amount of guff and myth that surrounds “traditional” reefing systems. Much of this doesn’t fully acknowledge the possibilities available with modern ropes and equipment, or the constraints of sailing with crews often less familiar with their craft than their full-time predecessors. I believe that in craft of up to say 12 m length, it should ideally be possible for one person to reef the mainsail from one position, as quickly and easily as possible and with the least scope for error.
Much of the “one position” aspect is a question of philosophy. Should all lines be led aft to the cockpit as is the current fashion in modern cruising yachts, or should you “work the mast”? Arguments against leading them aft include:
- complexity – especially when you consider the increased number of lines associated with gaff rig
- the cost and unreliability inherent in having a greater number of components to go wrong (at the worst moments)
- clutter on deck/cabin roof
- the fact that not all the jobs – e.g. tying reef points – can be done from the cockpit anyway
All that said, I have seen a number of gaffers so arranged, and their owners express themselves happy with the scheme. My own view is that, in addition to the factors above, it is better to be used to working the mast as a matter of course for when things go wrong. Which leads us on to the aspect of “quick and easy”. Much of that has to do with the detailed arrangement of the gear, best illustrated by going through the motions of putting in a reef.
Step 1 – Top up the boom
The idea here is to stop the boom dropping so far that you cannot tighten the leech pendants, and also to help restrain the gaff laterally. Controlling the boom’s lateral position depends on how near to the wind you are and whether you have a gallows or crutch arrangement. In my view, gallows/crutches are a mixed blessing on medium sized craft. If you can successfully coax the boom into said, perhaps using the mainsheet to hold it down, one of the more hairy jobs to do during reefing is accomplished. But you are then constrained to be more or less head to wind while you reef. This is fine if you are reefing on a mooring, but you may not be able comfortably to keep such a course whilst under way. Perhaps a better approach is to heave to, which works miracles on the amount of motion sustained, and the amount of wetness suffered. The snag is that it is unusual for the outboard end of the boom to be over the deck whilst hove to, so you can’t put it into gallows. If you take station at the mast, and can top the boom up enough to avoid heads in the cockpit, I’m not sure it matters that the boom can move sideways. With regard to the topping lift itself, it is a distinct advantage to have one each side of the sail so that the weather one can be set up whilst reefing, leaving the lee one slack.
Step 2 – Lower the throat halyard.
With a good set up you shouldn’t have to do more than make slight adjustments to the peak halyard for the first reef, possibly the second one too, and some mucking about with spans and leads should achieve this. So lower the throat halyard until you are able to secure the appropriate luff cringle. To make the job easier:
- put a marker in or around the halyard to indicate how much to lower it for each reef position
- use ram’s horns or hooks mounted near the gooseneck, or lines already made up which simply need looping over a hook. A line for each reef is a good idea. What you don’t want to be doing is footling around with a bit of spare line making up a lashing in horrid conditions
- colour code the hooks or ties. Purists may think this a nasty idea, but particularly with scratch crews, having all lines associated with a particular reef the same colour goes a long way to reducing errors. Perhaps yellow for the first reef, red for the second, brown for the third?
Step 3 – Tighten the throat halyard.
This ensures the luff cringle doesn’t unhitch itself from the hook or line you have just put it on. If you have had to slacken the peak halyard as well, leave it for the moment.
Step 4 – Make fast the leech cringle.
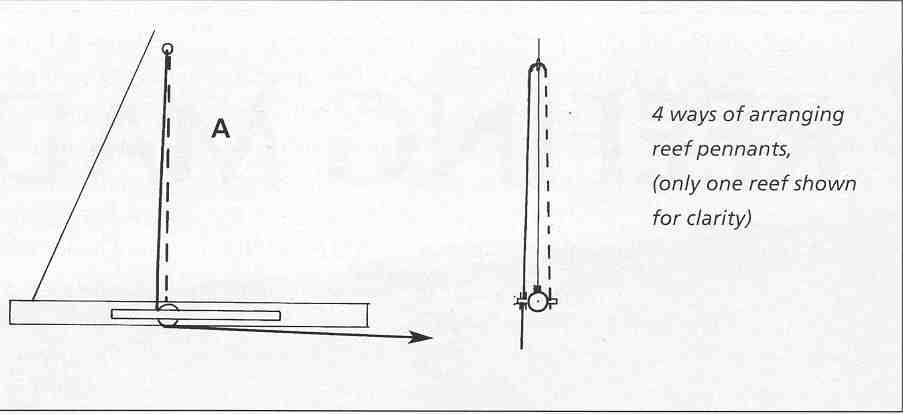
 This is much easier said than done. Like the clew attachment under full sail you need both a downwards pull to keep the sail next to the boom, and an outwards pull to tension the foot of the sail. It also helps to try to minimise friction. Compare the following arrangements:
Scheme A – sometimes seen when bee blocks or combs are fitted to the side of the boom, but in the wrong position. This is fine for downwards pull, hopeless for foot tension
Scheme B – a good compromise, with the pendant anchored well aft of the cringle to give good foot tension. The snag is that with the side to side arrangement shown, it is important to reef with the boom sheave to windward otherwise you risk jamming the sail in the pendant as you reef.
Scheme C – the bad news is that there is a bit more friction in this arrangement than scheme b, and it is very hard to get the last couple of inches in, but the good news is that you can reef from either tack.
Scheme D – fudges its way through all of these. By having a double ended pendant, you can reef on either tack. By having the bee block sheaves mounted a little way aft of the leech cringle, you can get good tension outwards and downwards. The snag is that you may need more cleats and/or stoppers, and there may be more lines running along the boom.
So much for arranging the pendant, now we need to tighten it. In all but the smallest craft, you will need some mechanical assistance. Traditionally this is done by means of clapping on a tackle onto the relevant pendant. I have to say that I think this a rotten arrangement. Firstly will the end of the pendant be in reach? Secondly, particularly when rigged with 3-strand rope, there is scope for such a tackle to twist around itself and so be reluctant to be extended at a critical moment. Thirdly, you have two blocks flailing around below the boom while you are trying to attach the thing. And can you guarantee that rolling hitch, tied in the dark with cold wet hands? After all that, you need to scheme a way to cleat the pendant off tightly, remove the tackle and prepare it for the next pendant. Despite jolly arguments to the effect that reef tackles can be pressed into service all around the boat, I find a small winch mounted underneath the boom – or one each side if you are feeling rich – servicing the clew outhaul and all the reef pendants via rope clutches or stoppers is a much better system. It can be operated while you are securely wedged at the base of the mast. It has more power than almost any tackle. You don’t have to traipse up and down the boom sorting out tangles or re-connecting the tackle. And when all’s done, the other reef pendants can be pulled through their stopper by hand to take up the slack. It is literally an order of magnitude quicker, easier, safer and more powerful than using a reef tackle on a medium sized boat. I know it is not traditional, but it works.
If necessary, now is the time to set up the peak halyard.
Step 5 Tidy up the sail
( or if running out of time or sea-room, skip to step 6!). By definition, this is an activity which cannot be done from one position on the boat. Nor can it be done “automatically”. The three basic options are; not to do it at all, to use spiral lacing or to use sail ties. Not tidying up the spare fold of sail is fine in the short term, or if you have run out of time or space, and perhaps on smaller craft. I have to confess I never bothered in my youth whilst racing, but I suppose it is a tad unseamanlike. I’m not a great fan of spiral lacing. Admittedly it has the advantages of equalising tension along the foot of the sail, and avoiding sail ties dangling form the sail when it is not reefed, but it is very fiddly to rig, requiring you to battle with a long piece of line in inclement conditions. My preference goes to sail ties permanently fitted to the sail at suitably reinforced eyelets. If the mainsail is loose-footed, then the ties are tied around the sail only. If the sail is laced to the boom, the ties can be tied around the boom, taking care not to trap reef pendants as you go, and trying to get roughly the right amount of tension in each tie. The snag here is that you may not be able to get to all the points to tie them safely. I’m not sure that this matters much so long as the helm can see, and you haven’t tied the outboard ones too tight. It may be better – certainly less error-prone – to tie the points around the sail even if it is laced to the boom; after all when you are reefed, the sail is effectively loose-footed. In all cases, the ties are tied with a reef knot, designed a’ purpose.
Step 6 – Slacken the topping lift(s)
Let draw, and continue on your way, hopefully much more comfortably
Summing it up
So “reefing made easier” boils down to four areas of detail:
- arranging the gaff spans and their layout to allow the peak halyard to be ignored as much as possible
- scheming a quick way to attach the luff cringle to the gooseneck
- leading the leech pendants to tension the sail correctly, and ideally to allow reefing on either tack
- a quick and powerful way of tensioning the reef pendant
With the possible exception of the last point, the cost implications of the above are trivial by comparison with the safety implications.
Other sizes of boat
So far, I’ve been talking about medium-sized craft, say between 6 and 12 m in length. How does the above scheme vary outside this size range? For larger craft, the increased numbers of crew, the sheer weight of the boom, and the easier motion change the arguments slightly. It is likely for example that boom gallows will become more useful. With an increased likelihood of two people involved in reefing, it becomes more important to positively locate the boom to minimise the risk of it knocking one of them overboard. In that case, some of the arguments against using reef tackles diminish, for example the awkwardness of moving along the boom to re-attach them. For smaller craft where speed is of the essence, it may be appropriate to use a single line reefing system, and not bother with sail ties at all. It is also usual to lead the lines aft from the mast to a central position in the boat, often the centreplate case. But the idea that reefing should be as easy as possible, and therefore done as often as is appropriate, applies to all.