
The point of this article is to deal with some of the detailed aspects of mast furniture. A few caveats are in order. Firstly any such list cannot be comprehensive; so if I omit something which has just come to your notice, I apologise in advance. All I can do is offer the benefit of my own experience to date, and what I know of other peoples. And we are all still learning. Secondly, because I am necessarily talking in general terms, it is possible that what I say may not apply to your particular situation. I am not trying to be evasive here, but there are often so many ifs and buts that making a general case can become flaky. Finally, apologies for the laundry-list style of the article. But enough hesitation.
Masthead Fitting

It can be a problem getting this fitting to stay put. If it can be capped, so much the better because that eliminates any chance of slippage, and may also provide a good place for fittings or brackets associated with instruments, antennae and/or burgees. If not, you will need cross bolts or a shoulder on the spar. A shoulder is preferable if there are cable runs, since cross bolts may interfere with these.
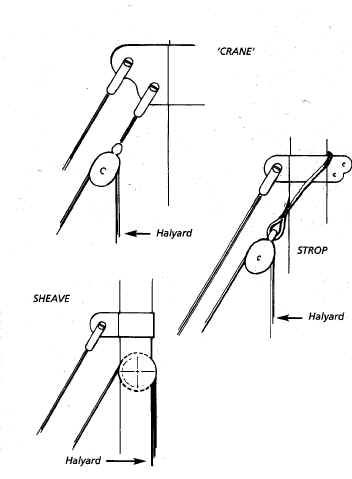
The next tricky bit is organising the jibstay and associated halyard, so that they don’t foul each other. If you have a reefing gear, life is easy (until you want to reef the bowsprit). With hanked sails or those set on furling gears, you need to organise a reasonable gap between the stay and the halyard to prevent the block and/or top swivel fouling on the stay. Three options are to use a sort of crane, or a strop for the halyard, or a sheave through the mast. These are shown in Figure 1. The crane is neat, but tends to put a downwards twisting load on the fitting which may need to be compensated for. A strop may be difficult to organise at this point since it will have to feed through the multiplicity of shrouds and backstays, and a sheave may lead the fall of the halyard to a place where it fouls the saddle. Yer pays yer money……

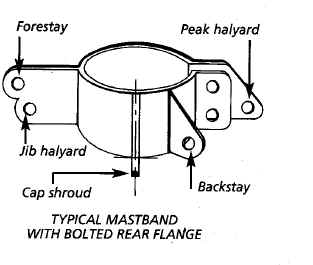
The topmast band is often a good place for the peak halyard – or at least one of the blocks – which can be neatly organised onto a lug. On a number of occasions, we have incorporated this into a bolting flange for the fitting – see Figure 2. Don’t, however be tempted into the cunning plan of combining the backstay attachments at this same place. If one has to suffer the inconvenience of two backstays, you may as well at least benefit from the redundancy which that allows, and attach each backstay to a separate point on the mastband. At least then should you break one backstay at the mast fitting, and with gaff rig the possibility exists, you don’t lose both together.
Peak Halyard Bands
If you have a peak halyard which uses more than one block on the mast, then it is better to use a band for these blocks rather than a crane. Why? Because peak blocks are pulling more sideways than down and a band is kinder to the mast than the nut and washer at the back of a crane. Also, you want to avoid through bolts in the middle of a mast panel, and a band will do this. Finally, if you have forgotten to put a solid section in a hollow spar, and/or need to move the position of the peak block, a band will allow this. While you are at it, if the lug or loop on the band goes sideways rather than vertically, the block will fit more neatly.
Hounds Fitting
Making sure that the hounds fitting stays put is vital, so try and work in a shoulder or chocks to help it do so. The next trick is getting the thing on in the first place. If one has a virgin spar, it may be easy enough to slide a fitting on in one piece, but at some point it will be a major headache to remove the fitting. Better therefore to make it in two halves. But an after bolted flange may foul the throat halyard, a forward bolted flange may make fitting a forward tang difficult, and athwartships flanges are fiddly to arrange if there are spreaders to be fitted. The most common solution is forward and after flanges, the forward one incorporating a crane for the headstay. In some cases we have used a hinge on the after face, which is neat but rather fiddly. Fiddly is a euphemism for expensive, by the way. Why not use the after flange for a crane for the throat halyard? The main job of the hounds is to stiffen the mast in way of the saddle, which is the largest sideways point load on the mast. If the hounds are far enough away from the saddle – in the full sail condition – to allow the throat halyard blocks to fit, then there may not be enough support for the mast at a critical point. Even at that too short a throat purchase can give you all sorts of funny leads on the gaff saddle. It is usually better to fit a crane.
Cranes
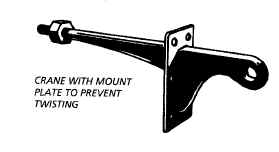

It is important that cranes – see Figure 3 – are not able to rotate. Traditionally this was done by making them from a tapered square section which was fitted through the mast and secured by a nut and washer at the after end. The same effect can be achieved by fitting a forward plate to fit to the mast which incorporates a screw fastening. If it is not practicable or desirable to run a bolt through the mast at the relevant position, you might consider using a crane band, but note that this will need a reinforcing tang to stop the mast being chewed up. The nice thing about any of these arrangements is that you can site the upper throat block slightly off centre, to throw the halyard down the starboard side of the mast. Halyards are usually arranged on the starboard side so that you can heave to on starboard tack whilst reefing, by the way.
Spreaders
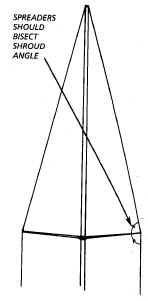
In the sort of rigs we are addressing here, it is unusual to allow spreaders to articulate in a horizontal plane. That is the sort of thing you do if you are interested in controlling mast bend which is all a bit racy. Quite often they don’t articulate in a vertical plane either, which is fine so long as whoever built the sockets knew what angle to build them at – to bisect the shroud angle – see Figure 4. As we said many magazines ago, it is vital to keep things like spreaders in compression, and restrict the bending. If the spreader roots are included with the hounds, it is often possible to extend the sides of the box downwards to form the lugs for the lower shrouds
Steps & Tabernacles
Except to say that the point load of the mast must be taken into the main structure of the boat – often by extending the mast step fore and aft along the keel to span a number of frames – I can’t really offer much useful general guidance about the design of mast steps. They tend to be constructed to suit the structure of the craft. Nonetheless, there are two areas to think about. Firstly, however good the boot around the mast a deck level, there will sometimes be fresh water dribbling down the mast. The mast step must therefore be constructed to drain easily to the bilge to prevent rot in the lower portion of the mast. Secondly, it is worth having some fore and aft adjustment of the heel to allow the mast to be raked without bending it. A difference of 6-8” at the masthead can transform the balance of a boat, and whilst one can often induce that by cranking away at the stays – so bending the mast – it is better to keep the stick straight if you can. By doing so you maximise the strength of the mast – see W4 for the arguments about buckling etc. Now you may be able to get this adjustment at deck level by having enough clearance around the mast. Certainly the collar itself should act as not much more than an attachment for the lower edge of the mast boot, and a lip around the fitting helps here. What is essential is that the mast is firmly wedged at deck level; the buckling load on a strut which is “pinned” at the hounds and at the keel is about 6 times less than one which is “pinned” at the hounds and “fixed” at the deck.
The issues posed by tabernacles are slightly different. Firstly, the pivot bolt should not be under load when the mast is stepped. The heel of the mast should bear on the deck, so either arrange some sort of wedge arrangement, or make the pivot bolt holes of such a size that the bolt becomes loose when the mast is upright. Secondly, it is important to take the load from the tabernacle into the structure of the boat. The easiest way to do this is to fit a pillar under the tabernacle which runs down to a step on the keel. If this fouls up the interior arrangement, it is possible to take the load on a bulkhead. The snag here is that generally one needs a doorway. If that can be made off centre, then the bulkhead can be locally stiffened on the centreline to take the load. If the doorway must be on the centreline, then some thought needs to be given to transmitting the load. Unless there is a huge beam, then an arch-topped door opening is usually the best bet, even though you may have to duck to get through it. Remember that as a rough rule of thumb, the mast is exerting a point load about the same as the weight of the boat, and that must be absorbed.
Above deck, a tabernacle is often used as the base for either a pinrail, or for turning blocks so that halyards and reefing lines can be led aft. Either arrangement is fine, so long as the lines do not foul the mast hoops or the saddle or the jaws. In my experience, they usually do, which is one of my reasons for disliking the trend toward leading all lines aft to the cockpit on a non-Bermudan boat. With a few exceptions, separate pinrails and reefing at the mast tend to be a more satisfactory solution – but I’ll deal with this whole topic later. Another trick is to incorporate the gooseneck onto the after face of the tabernacle, so that the mast can be lowered without un-rigging the sail. This is useful on Broads boats, where the ability to shoot bridges is handy, but the number of times I hear the French canals cited as the reason for a lowering mast borders on the incredible. Anyway, if you wish the gooseneck on the after face of the tabernacle, and you wish to lower the mast on a regular basis, leave lots of vertical clearance between the pivot bolt ant the gooseneck. It is amazing how much height a stowed sail takes up, and if I had a pound every time I’ve got this wrong……..
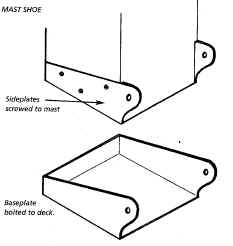
For craft up to about 20 feet long, there is a neater arrangement than a tabernacle for providing a mast hinge which works fine as long as the lowered mast does not have to clear a cabin top or similar obstruction. I “borrowed” the idea of a “mast shoe” from Iain Oughtred’s Wee Seal. Figure 5 describes it more quickly than I can in words.

Well, I think I have finally finished with masts – it only took 6 articles! Next stop is the gaff.