
In the last article we got as far as putting terminals on to wire ropes. They are only any use if we attach them to the things they are meant to be supporting, so let’s look at attachments to spars.
Keeping it Simple
The easiest way to attach a stay to a spar is to make a large eye in the end of the wire and loop it over the spar. The wire needs to be one of the more flexible varieties – 7 x 7 or 7 x 19 – and located either on a shoulder or on some kind of chock to stop it slipping down the spar. To protect the spar it is necessary to cover the wire with something like plastic hose, leather or serving, but apart from that it has to be the cheapest, simplest and most reliable way of attaching a stay that there is. The main drawback to this method is that it takes up a fair bit of room along the spar, particularly at the hounds, where you might have two pairs of lower shrouds, a forestay, a pair of runners and possibly a throat halyard strop all coming together at roughly the same point. This can get messy. Besides that, removing an individual stay requires the removal of all the stays above it, and so possibly unstepping the mast. Finally, since the wires are very close to the spar at their upper end, they need to be fitted some way above jaws or saddles – or outboard of travellers – to avoid jamming said fittings into the stays. All that said though, it is a reliable way of attaching stays which is often overlooked for no good reason.
Sizing of Lugs
If you want to avoid some of those shortcomings, or you are using swaged or swageless terminals, the next option to consider is mastbands. In this case the wires are attached by means of lugs. The dimensions of these are, however, constrained by the dimensions of the forks or eyes fitted, which are themselves specified for a given size of wire.
| Table 1: Principal Lug Dimensions | |||||
| Wire Dia | Thickness (t) | Outer Radius (r) | Hole Dia (h) | Minimum Length (l) |  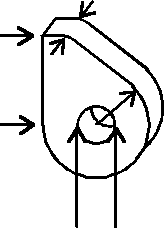 |
| 3 | 5 | 8 | 6.5 | 10 | |
| 4 | 6 | 12 | 8.5 | 16 | |
| 5 | 8 | 16 | 10 | 22 | |
| 6 | 10 | 20 | 12 | 28 | |
| 7 | 10 | 23 | 12 | 34 | |
| 8 | 12 | 25 | 13.5 | 36 | |
| 10 | 16 | 27 | 16 | 38 | |
| Notes:
1. All dimensions in millimetres 2. Hole diameter may vary slightly with different fittings 3. The length dimension (l) may be larger 4. The shape does not need to be as drawn |
|||||
Figure 1 shows the main dimensions of lugs for the various sizes of forks available. You don’t have to stick to the shape of the lugs, but the constrained dimensions, such as radius and thickness, coupled with the guide-line that the attachment should be 50% stronger than the wire, means that the material must be of a certain strength. Most wrought materials – steel, stainless steel, phosphor bronze, aluminium bronze for example – are strong enough. Most cast materials are not, partly because cast metals – particularly the various yellow metals – are weaker than their wrought equivalents, and partly because however good the casting, you must make allowances for potential defects in the integrity of the material. What this means is that if you have standard fork ends at the upper end of your stays, and your stays are correctly sized, then you are better off to have a fabricated mastband.
This is not quite as tragic as it sounds, because it is quite easy to remove the conditions which lead to this conclusion. You might for example overspecify the wire, which leads to larger forks, which allows more material, but this approach is intellectually squalid and needlessly expensive. Another possible idea is to use eye terminals on the wires, and one lug each side of the eye. In this case you can halve the thickness of the lugs for wrought materials, or use two of the specified thickness for a cast mastband. Then again, you might use a shackle to connect the eye of the wire to a lug large enough to accept the jaw of the shackle.
| Table 2: Lug Thicknesses based on Matching Shackle sizes | |||||||
| Stainless Wire/Shackles | Galvanised Wire/Shackles | ||||||
| Wire dia(mm) | Shackle Size(mm) | Shackle jaw width(mm) | Fork end lug thickness (t), for comparison | Wire dia(mm) | Shackle Size(mm) | Shackle jaw width(mm) | Fork end lug thickness (t), for comparison |
| 3 | 4 | 8 | 5 | 3 | 6 | 12 | 5 |
| 4 | 5 | 10 | 6 | 4 | 8 | 16 | 6 |
| 5 | 6 | 12 | 8 | 5 | 10 | 20 | 8 |
| 6 | 8 | 16 | 10 | 6 | 12 | 24 | 10 |
| 7/8 | 10 | 20 | 10/12 | 8 | 16 | 32 | 12 |
| 10 | 12 | 24 | 16 | ||||
| Notes:
1. The maximum lug thickness when a shackle is used to terminate is the shackle jaw width less a bit – say 1mm. 2. You can see that by comparison with the lug thicknesses from Table 1, that you can add at least 50% more thickness to the lug. |
|||||||
Table 2 gives the various dimensions, based on the table in the previous article which matched shackle strength to wire strength, and there is now enough thickness in the lug for any commonly used metal to be adequately strong. Which is where the standard cast mastbands – available from 2” to 4” diameter – come into play. The gunmetal ones are OK for wire up to 4mm diameter, the cast iron ones for wire up to 5mm diameter, so they are fine for smaller craft.
Whatever lugs you end up with, they need to be attached to a band which is at least half the thickness of the lug. In practice it is rarely a problem to achieve this.
And the Band Stays on…
OK, so now we have lugs on a band. Now we have to locate the mastband on the spar. However you do this, you will need an estimate of the force that you are trying to resist. Adding up the combined breaking strain of all the wires attached to the band will give a silly answer, because only one of a pair of shrouds, say, will be loaded at any one time. So add up the breaking loads, or design loads if you know them, of a set that could be loaded at the same time. For example if you have an 7mm forestay, 2 6mm lowers and a 6mm backstay, that will give you a total of about 11.5 tonnes maximum downward force.
Creating Friction
The easiest way to do it, if possible, is to cap the top or outboard end of the band, and sit that onto the spar. In a number of cases this is not possible or desirable, so you will need to use one or more of the following: friction, a shoulder on the spar or through bolts. Let us deal with friction first, which in our case means clamping a band to the spar in the hope that it will stay there. Perhaps a quick digression is in order for those of you who have never really wondered about friction. If you have two surfaces in contact, perhaps a tyre on a road or a paving slab on the ground, then the amount of friction between them is a function of the amount of force keeping the surfaces together, but not, oddly enough the area of contact. Figure 1 shows what I’m trying to talk about.

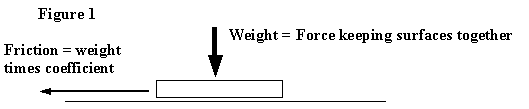
To get a feel for it, imagine this paving slab on the ground. On its own, you may be able to push or drag it along, overcoming the friction which is a product of its weight multiplied by the coefficient of friction. Increase the force holding the slab to the ground, perhaps by someone standing on it – some people are helpful like that – and the thing will become more difficult to drag along. In other words the friction has increased because the downward force has increased.
Meanwhile, back at the mastband, tightening the clamping bolts increases the force holding the band to the spar, and so the frictional force which will stop the band sliding down the spar. But in this case there is a limit to the extent to which you can do that, which is found when you start to crush the wood. As you will know wood is fairly strong along the grain, but less so parallel to it (15 MPa and 2.5 MPa respectively). Assuming that you don’t want a fitting which damages your spars, the maximum compressive stress across the grain thus gives you a maximum amount of force onto the wood, which in turn gives a maximum amount of friction. After doing a batch of sums, I reckon that the maximum fictional force you can generate between a metal mastband and a wooden spar is given by F(max)=0.24 x d x l, where F is the frictional force in kgf, d is the spar diameter in mm, and l is the depth of the mastband in mm. If the spar being supported by the wires listed above is about 165 mm dia, and the mastband about 60mm deep, then the maximum force it can withstand is about 2400 kgf. Now I know that some of the assumptions which I have used to get to that answer may not be entirely rigorous – I’m happy to kick them around with anyone so interested – but 2.4 tonnes is nothing like the 11.5 tonnes we need. I come to the conclusion, then, that trying to fix mastbands to wooden spars by friction alone is unlikely to be successful without crushing the wood. So what? So on wooden spars you need to use either a shoulder or through-bolts. So on spars of material other than wood – perhaps carbon fibre – which can withstand a higher compressive stress, you could use friction on its own, and in fact we have successfully done so.
Shouldering the Load
So how big a shoulder to use? In one of the bowsprit articles I worked out a sum for shoulder strengths of S = 4.8 x (d-t) x t. ( t being the shoulder depth in mm). In our case that leads to a shoulder depth of about 16mm. This is probably unrealistic here, because you might not want to reduce the spar diameter from 165mm to 133 mm. Besides, the mastband would have to be made from 16mm material – 5/8” in old money – to bear on the shoulder. That is a bit hefty by any standards.
Bolting
So try through-bolting. But this weakens the mast, I hear you cry. Well, if you reckon that there is even a grain of truth in all that stuff on buckling in the mast loading article, the points at which the stays support the mast could be hinges and the mast would still stay up – though I realise that that in practice no one would construct a mast like that. So through bolts have almost no impact on the ability of your mast to stay upright. (Please note that this argument does not apply to gooseneck bands or spider bands, where through bolts should be avoided like the plague – we’ll deal with these in a future article.) Going back to our example, we need a couple of 16mm stainless through bolts, or a couple of 12mm ones together with either a 6mm shoulder or a clamped band.
And what happens if your mast is not round – or nearly round – and/or you have a track for your sail? Well you have to move away from mastbands to plate type attachments. Nat and Francis Herreshof were men who gave such fittings more than a little thought. An example taken from “Sensible Cruising Designs” (if you don’t have a copy, get one) is Nereia’s shroud attachments illustrated on page 88. Is this a good fitting? Well, he assumed that the breaking load of the wires fitted to this fitting was 10,540 lb ( 4778 kgf). The material is specified as half hard phosphor bronze, which can cope with 630 MPa. That gives, allowing for stress concentrations around the holes, 7500 kgf maximum strength in each lug, and 7900kgf for each pin. So far, so good. Assuming that the myriad woodscrews are simply there to generate a frictional force, then that is somewhere between 2,000 and 4,000 kgf on each plate without crushing the wood. That leaves a further 11,000 kgf or so to find from the through bolts and/or the woodscrews if I want a factor of safety of about 1.5. The two through bolts – each 1/2” provide 9700 kgf allowing for the fact that they are drilled out. Add a bit for the shear strength of the woodscrews plus “when countersinking the plates 1 & 2, the burr of the countersink should be left on the inner surface as this will increase their holding power on the mast”, and you get the impression that Herreshof was a clever chap. And that I am treading down a path which is at least 50 years old!
I think now that by now we have pretty much covered the engineering aspects of stay to spar attachments, so next time I’ll have a look at hull plates, stay tensioners – i.e. rigging screws etc. – and the practical aspects of all these.