
Blocks and tackles, this time, and I might as well be honest about it. There is not a lot of MacPhail in this article, and a good deal of other people, so I’d like to start by acknowledging my main sources, which are useful in their own right.
Admiralty Manual of Seamanship – HMSO – various editions, I’m using the 1964 version. Inevitably there is a lot of stuff about the conduct of warships and the duties of the Officer of the Day, ( though for some reason they forgot the very good advice that if you are on the gangway, and some matelots are coming back hog-whimpering drunk, you should find a job at the other end of the ship, leaving the quartermaster to practice his skills of tact and diplomacy). But there is also a great deal on seamanship skills, culled form generations of experience. It is worth having a copy of the first 2 volumes.
The Rigging Handbook – Brion Toss – Adlard Coles 1998. Perhaps the modern book on traditional skills, if you get my meaning. He is excellent at culling the best of the new and melding that with the best of the old.
The Marlinspike Sailor – Hervey Garret Smith – International Marine –1993. Though a slim volume, an absolute delight from start to finish. His version of a rope ladder is the envy of my offspring’s friends.
Cruising Rigs and Rigging – Ross Norgrove – Adlard Coles 1983. Again a pragmatic mix of current practice with traditional methods. It is also very funny.
So why am I picking other men’s flowers? Because, sat as I am at the receiving end of a telephone line in a chandlery, I get the sense that many people become a tad confused when it comes to blocks, tackles and their arrangements. So I thought I’d take a step back and start at the beginning.
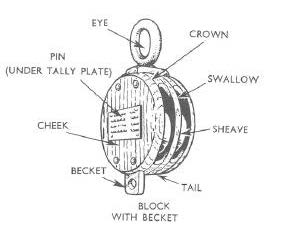
The naming of the parts.
The main part is the shell or body, the length of which is traditionally used to specify the size of the block. Inside that is the sheave, which is scored to take the rope or wire. The sheave runs on a pin, and sometimes also on a bush or bearing. Except on a strop block, of which more later, the whole thing is held together by a metal binding. Sometimes this may be extended beyond the shell to form a becket. The top of the block – where the eye or hook is – is called the crown, the other end the arse or tail. The sides of the shell are the cheeks, and the opening through which the rope passes is the swallow.

Materials used in blocks
The shell may be made from wood – elm, teak or ash being common choices – or tufnol. For those of you not familiar with this stuff it is layers of fabric bound together using phenolic resin. It produces a block which is brown in colour, quite pleasing in appearance and which is relatively maintenance free. Other, more high tech stuff is used, but I’m going to concentrate on blocks which might be used in classic boats.
The binding, which is the load bearing part of the block, is commonly fashioned from metal; galvanised steel, stainless steel and one of the higher strength bronzes being the usual choice. There are many permutations in the end of the binding including oval eye inline, oval eye across, swivel oval, swivel hook and bow end. Generally speaking it is better to go for one of the non-swivelling versions if you can, since it is difficult to engineer a swivel binding to full strength. In any event, there are occasions where a swivel end, combined with the natural tendency of rope to twist under load, can create an inconveniently remote snarl up.
Instead of bindings, strop blocks use a grommet of wire or rope incorporating a thimble at the crown, and if a becket is required, one at the tail. This makes for a light, quiet (the rope acts as a sort of fender) and elegant block. Both Brion Toss and Hervey Smith rate these highly, and include instructions on how to make grommets in wire and rope.
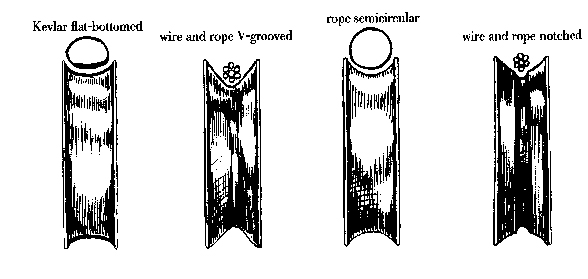
Sheaves are made from a variety of materials. In metals, aluminium, galvanised steel and bronze are often used, and this is often thought to be the best way to do it. I’m not such a fan of metal sheaves. Except for wire rope where the surface hardness is critical, I think plastic preferable because of its lightness. Nylon is not a good choice, because it can distort under load, wear quickly and also has a tendency to swell if damp, sometimes jamming the block. Better choices are acetal, delrin and – if you count it as a plastic – tufnol. An important aspect of sheaves is the shape of the score, which needs to be different for traditional rope, wire rope, and modern composite ropes. The picture – from the rigging manual – shows the differences. Please note that if you have a notched wire & rope sheave, and then convert to an all rope halyard, it will chafe like mad on the edges of the notch.

Bearings are used between the sheave and the pin either to overcome material deficiencies, like the softness of plastics or corrosion in metals, or to reduce rolling friction. There is no one size fits all answer, the appropriate solution varying with the amount of load, the type of load and the material of the sheave. I’ve tried to summarise this on the table below.
| Sheave Bearing Selection | |||
| Material | Load Amount | Continuous Load | Running Load |
| Acetal/Delrin | Light | OK as is | OK as is |
| Heavy | Bronze bush* | Ball/Roller bearings | |
| Tufnol | Light | OK as is | OK as is |
| Heavy | Bronze Bush* | OK as is | |
| Bronze | Light | OK as is | OK as is |
| Heavy | OK as is** | OK as is** | |
| Galvanised | All | Bronze bush*** | Bush or Bearings |
| Aluminium | All | Bronze bush*** | Bush or Bearings |
| Notes* bronze bushes are either plain bronze or oil-filled sintered bronze, Oilite is one trade name
** depending on the alloy. Gunmetal and phospor bronze are quite good at self-lubricating *** both alloy and galvanised sheaves can corrode onto a stainless pin, and a stainless bush can spall, so bronze is generally preferred |
|||
Sizing
The old rule of thumb was 3” of shell per 1” circumference of rope, but modern rope is so much stronger than its traditional counterpart that either you select blocks on the basis of strength to match the rope – the block is likely to be oversized then, which is no bad thing – or you choose a rope which is comfortable to handle (or which fits the winch or whatever) and match the block to that as long as the strength of the block itself matches the envisaged loads. In any event it is important to think about the size of the sheaves in relation to the size of the rope. You should use about 6 times the diameter of the rope for traditional rope, 10 times for Kevlar etc and at least 12, preferably 20 times the diameter for wire.
Spreading the load
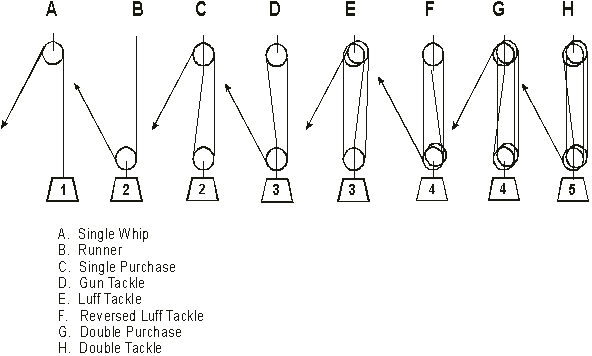
If the load is too much to handle, use a tackle – apparently pronounced “tayckle” though it always sounds a bit affected to me. With every block in a tackle you gain either convenience or advantage depending on how the tackle is rove. In short, if the final part of the tackle – the hauling part – leads to you from the thing you want to move, then the tackle is “rove to advantage”. If not then it is “rove to disadvantage”, which refers to the power, not necessarily the convenience. On a two-block tackle, the purchase is given by the number of parts of rope entering or exiting the block attached to the moving block. Unfortunately the other thing you gain with every block in a tackle is friction, and that reduces the actual power you can realise from any given tackle. In round numbers, you should allow losses of 5-10% per sheave unless you are using really sexy bearing materials. That means in a double purchase hauling 100 kg some 5 to 10 kg of your pull is spent on overcoming friction. The easiest solution is to increase the sheave diameter, but this brings obvious disadvantages of cost, weight and size. For an alternative solution, see the new hollow blocks made by Harken, Lewmar and others, which have a large diameter ball race on a huge sheave. For us ordinary mortals who can’t bear the thought of spending huge amounts of money on each block, a sensible choice of sheave size and bearing type will go a long way to reducing misery.
The figure shows schematically the most common arrangements of two-block tackles, and their names – probably more often used in trivia quizzes than real life! Anyway, the first four are straightforward, but it becomes worthwhile considering permutations for any which involve a double block. If you have the space, fiddle blocks are a better bet since all the parts of the tackle are in line. The two possible snags are that the second sheave of a fiddle block is necessarily small, and that they take up a lot of room. Stuck with double blocks? You will find life much easier if you arrange your two-block purchase so that the two blocks lie at right angles to each other. This ensures that as the blocks approach each other, the parts of the purchase are kept apart, and you don’t get a massive increase in friction over the last few feet.

A common source of confusion arises when tackles are split into many blocks, so it is not obvious what the advantage is. By sorting out which bits are attached to the moving part, and which to the fixed part, you can consolidate them into the equivalent purchase. I’ve tried to illustrate that below with three examples.
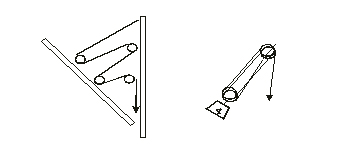
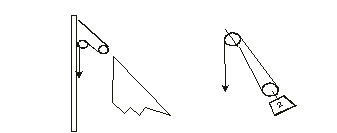 A common foresail halyard arrangement, where the halyard starts at the mast, goes to a block at the head of the sail, back to a block on the mast and then down to the deck. Adding the various bits together, you end up with a single purchase with a 2:1 advantage
A peak halyard with blocks all over the place, but again consolidating the elements on the fixed and moving parts resolves the tackle into a double purchase with 4:1 advantage
Finally a double-ended mainsheet. Assuming one end is cleated, then hauling on the other will give you 4:1 advantage. The sheave nearest the cleated end does nothing at all, and so doesn’t feature in the addition. 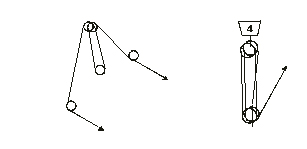
In practice two sheaves is usually as many as you want in any single block; certainly trebles should be used sparingly. If you want a purchase of more than 4 or 5 to 1, then the trick is to add tackles to each other rather than going for blocks with ever larger numbers of sheaves. For example you might arrange a 2:1 halyard such that one end leads straight to a cleat (so you get the bulk of the sail up using 2:1) and the other leads to a 4:1 purchase for hardening up the last few inches with what is effectively an 8:1 purchase.
Next time I’ll have a look at how these elements get to be used on a boat. Meanwhile why not have a think about your own arrangements and see if some judicious re-arrangement of your tackle may be in order!
In practice two sheaves is usually as many as you want in any single block; certainly trebles should be used sparingly. If you want a purchase of more than 4 or 5 to 1, then the trick is to add tackles to each other rather than going for blocks with ever larger numbers of sheaves. For example you might arrange a 2:1 halyard such that one end leads straight to a cleat (so you get the bulk of the sail up using 2:1) and the other leads to a 4:1 purchase for hardening up the last few inches with what is effectively an 8:1 purchase.